Wiring branches is the foundational technique that determines a bonsai's final shape, yet it is also the step where beginners most often damage their trees. This bonsai wiring technique at a 45 degree angle to prevent bark marks will help you master the wrapping angle, choose the right wire gauge, and time wire removal so you can bend branches exactly as intended without leaving ugly scars on the trunk. This is core knowledge every enthusiast who wants to improve their styling skills must master.
Why correct wiring matters for bonsai
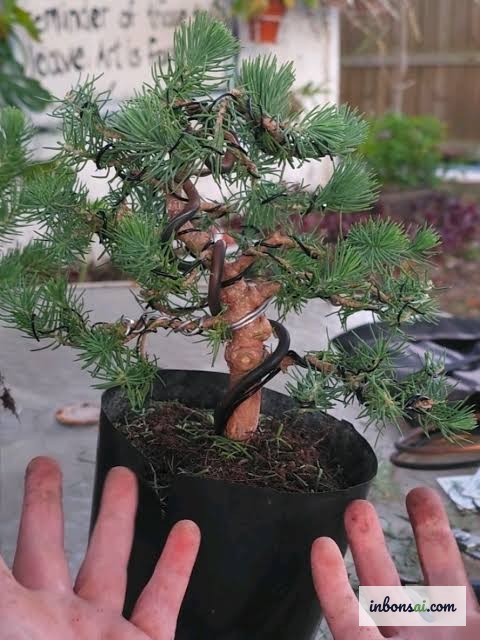
Wire acts like a temporary "skeleton" that holds a branch in its new position until the wood hardens and memorizes that shape. If wired incorrectly, the branch will spring back the moment you remove the wire, or worse, leave deep spiral scars in the bark — called "wire bite" — which ruins the aesthetic and can be permanent.
The goal of wiring is not just to bend a branch, but to control the direction it travels according to your design intent. A properly wrapped wire lets you bend the branch down, sideways, or into a natural undulating curve while distributing force evenly along its length.
Wiring correctly also protects the branch from cracking. When the wire hugs tightly at the right angle, it becomes a support point that helps the branch withstand bending force far better than bending bare-handed. This is why masters always treat wiring as a mandatory step before bending, not an optional one.
Beginners are often impatient to see the finished shape immediately, so they tighten the wire too hard and bend branches forcefully. The result is deep bark bite, cracked branches, or a stiff, unnatural form. Understanding the true role of wire — as a gentle guiding tool, not a vice — is the first step toward styling that is both successful and durably beautiful.
Choosing the right wire type and gauge
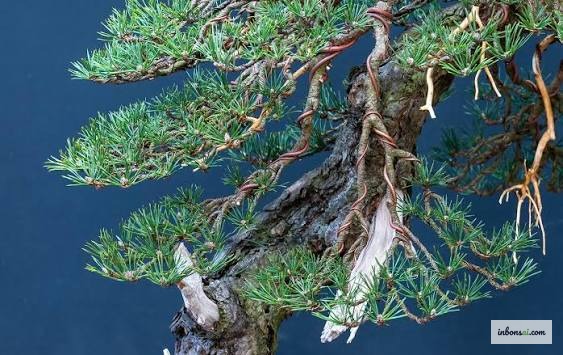
There are two common wire types: anodized aluminum (dark brown) and annealed copper. Aluminum is soft and easy to handle, suitable for beginners and broadleaf species. Copper is stiffer and holds force better, typically used for conifers like junipers and pines — but it is harder to apply and needs to be annealed by fire to soften first.
The golden rule for gauge: the wire diameter should be about one third of the diameter of the branch being bent. The thicker and stiffer the branch, the thicker the wire needed. If the wire is too thin it won't hold and the branch springs back; if too thick you can't wrap it flush and risk crushing the bark.
When in doubt, wrap a short section and bend gently. If the branch holds its position without extra force, the gauge is correct. For very stiff branches, you can wrap two thin wires in parallel instead of one thick one — this gives equivalent holding power but more flexibility when removing.
See also the bonsai aging technique for old bark to understand more about bark structure and how to protect it during styling.
Bonsai wiring technique at a proper 45 degree angle
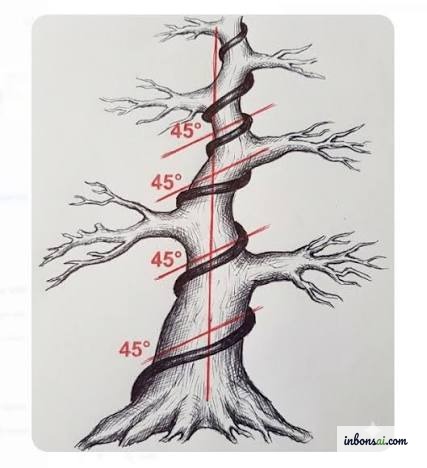
The wrapping angle is the single most important technical factor determining holding effectiveness. A 45 degree angle between the wire and the branch axis is the ideal ratio that masters have agreed on across generations. This angle creates enough friction to hold the branch while allowing multi-directional bending without the wire slipping.
If you wrap too shallow (an angle smaller than 45 degrees, with coils nearly parallel to the branch axis), the wire won't grip enough and slips when bending. Conversely, if you wrap too steep (an angle greater than 45 degrees, coils nearly perpendicular to the axis), the wire will cut deep into the bark as the tree grows, causing severe wire bite.
The spacing between coils must also be even, ideally a gap equal to one coil's width. Even spacing distributes force uniformly, avoiding tight-here-loose-there patches. Wrap in a consistent direction, hugging the bark but not squeezing — you should still be able to slide a fingernail under the wire after wrapping.
A small trick to check the angle: look along the branch and the coils should form even diagonal lines like a spiral thread. If the coils bunch up or are spaced unevenly, unwrap and redo it. Don't begrudge the effort here, because a clean wrap from the start saves a lot of repair time later and ensures the branch holds the intended shape.
Wrapping order: from trunk to primary then secondary branches
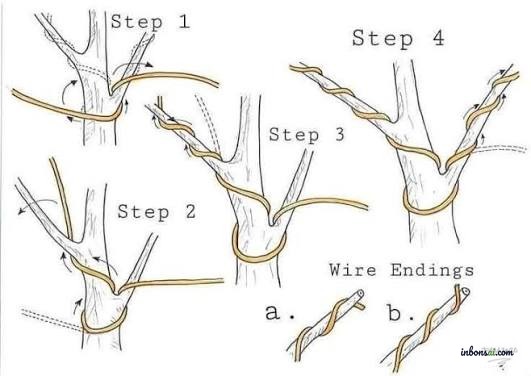
A common beginner mistake is wrapping randomly without sequence, leaving the wire crossed over and without a firm anchor. The correct rule is to wrap from the inside out: start by anchoring the wire to the trunk or a large branch, then wrap out to the primary branch, and finally to the secondary branches.
The starting point (the anchor) must be solid. You should insert the wire end into the soil or wrap it around the trunk at least twice before heading out to a branch, so the wire doesn't pull loose when bending. If wrapping two same-size branches near each other, use one continuous wire anchored across the trunk and split to both sides — this uses the trunk as a pivot, saves wire, and is more secure.
When passing a branch fork, always tuck the wire under the fork so it doesn't pop loose when bending. Wrap each branch in turn to finish one layer before moving to the smaller branch layer. This systematic approach lets you control the whole tree and easily re-check each section.
How to bend branches after wiring to prevent bark marks and cracking
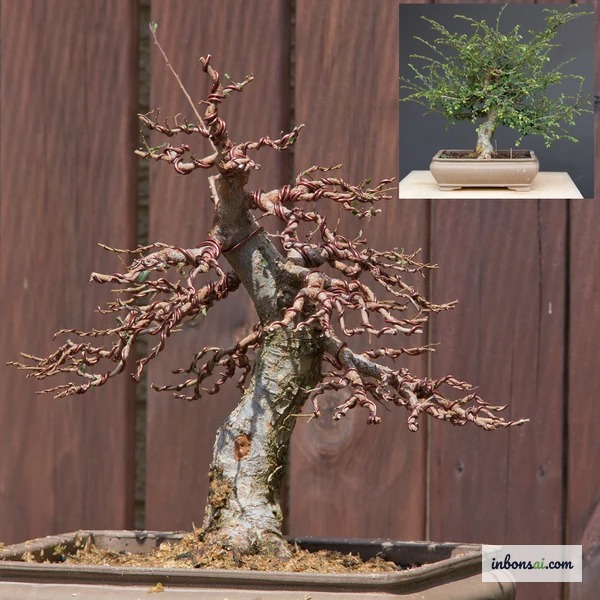
Only bend after wrapping is complete — never wrap and bend at the same time. Use both hands: one hand supports the base of the branch as a pivot, the other gently bends the tip toward the desired direction. Bend slowly, feeling the tension of the wood grain, and stop the instant you hear a faint crack.
For thick branches prone to cracking, you should wrap a layer of grafting tape or cloth raffia around the branch before applying the wire. This cushioning layer spreads the force, reduces the risk of bark splitting, and also limits wire bite. Bending in several stages over a few weeks rather than forcing the curve in one go is also safer for large branches.
To prevent bark marks, the most important thing is not to tighten the wire too hard and to monitor the tree's growth rate. During strong growth seasons, branches thicken quickly so wire can bite into the bark in just a few weeks. If you see the wire starting to sink in, remove it immediately even if the branch isn't fully set. Refer also to the Tanuki bonsai technique to learn how to combine branch bending with advanced deadwood styling.
Signs you need to remove wire and how to do it safely
The timing for removing wire depends on the species and season, usually 3 to 6 months for small branches, longer for large branches that lignify slowly. The clearest sign to remove is when the wire starts to indent the bark, leaving a slight groove — this is when the wire has "bitten" about one third of the bark layer and you must act immediately.
The safest way to remove is to cut the wire into small segments with a wire cutter, never by unwinding it against the wrapping direction. Unwinding easily scrapes the bark hard, peels the branch, and ruins your styling effort. Cut one coil at a time and gently lift each piece off the branch.
If the branch hasn't held its shape after removal, let the tree rest for a few weeks then re-wire it in a position offset from the old marks — don't wrap exactly over the old path so the bark has time to recover. For stubborn branches, you may need to repeat the wire-remove cycle two or three times. Patience is key: a beautiful, natural branch shape often takes a full year to fully set, but the result is well worth the effort.
Tags
#bonsai-wiring#branch-bending#bonsai-styling-technique#prevent-wire-biteGet bonsai guidance every week.
Fresh care guides, styling notes, and bonsai inspiration delivered to your inbox.