Ling Nam Bonsai Trunk Styling Method (Grow-and-Prune Technique) (Part 1)

InBonsai Team
December 6, 2025 · 8 min read
Ling Nam Bonsai Trunk Styling Method (Grow-and-Prune Technique) (Part 1)
The trunk styling method for Ling Nam bonsai describes how to connect successive trunk sections when shaping these trees. Avoid selecting bonsai with trunks that are too straight or too dramatically curved. The trunk should show life and beauty, so the connecting sections need defined movement without being exaggerated. That sense of vigor and age should suggest an ancient tree that keeps fighting after injury, which directly influences the artistic effect of the bonsai.
Different natural environments and large external changes create wonderfully varied bark gestures, and each trunk form conveys a different meaning. By traveling, observing, and categorizing, we use these references to design Ling Nam bonsai branches with intentional planning—what artisans call “work in motion, intent beyond the form.”
Extended droughts and water shortages create naturally tall, slender trunks composed of many segments—one of the hallmarks of towering trees. When trees are broken by outside forces or fire, the fallen trunk can lie along the soil, sprout new roots, push out shoots, branches, and new trunks, forming clump-style bonsai.
Some trees sprout from cracks in high cliffs. They are shattered by environmental shifts or storms and cannot rise upright. They can only crawl downward to survive, showing a fighting spirit and priceless vitality. Cascade-style bonsai borrows from these subjects. Since pruning techniques emerged in the 1920s, they have grown from just a few forms to dozens today.
1. Example of the grow-and-prune technique for large-form bonsai
Grow a young tree until it matures with a trunk diameter of 15 cm and a height of 85–90 cm. Begin cutting when the trunk reaches 9 cm in diameter and make a saw cut 40–45 cm high. The best timing is early spring as new buds appear. Twenty days later, many uneven buds will emerge. Around day 60, select a relatively ideal bud 30–40 cm high to become the new leader. When the other buds reach 1 cm in diameter and 8–10 cm in length, prune them off to control branch growth. Place the leader above or below eye level based on the base shape. If the tree is upright leaning slightly right or is already right-leaning, keep a bud on the left of the cut as the leader and lean it slightly left; keep another bud on the right for the first branch and set it a bit lower than the intended height. If the tree is upright leaning slightly left or already left-leaning, keep a bud on the right of the cut as the leader leaning slightly right; keep another bud on the left for the first branch and also set it slightly lower than the intended height.
2. Styling method for a tree leaning to the right
If the left lateral root (the main root) of an upright or right-leaning bonsai is thick, raised, and extends farther, select a left-side bud on the main trunk as the leader and place the first branch on the right. Wire the second segment of the leader early with aluminum wire so it tilts slightly left and also a little toward the back. The goal is to create a clockwise twist. Choose a bud on the right side to form the first branch and wire it slightly below the intended height, letting its extension become a branch plate. This keeps the height distribution after growth and helps separate the layers clearly.
Each trunk section needs to twist and change so the tree does not look stiff and instead appears more natural. The length of each section should stay proportional to the trunk diameter and overall length. The first section and first branch depend on the planned total height. Cut each section 10–15 cm apart. Choose the first branch around 35 cm high; when complete, the total height of 85–90 cm looks reasonable and natural.
If the trunk is designed to be less than 12 cm in diameter, you can set the second branch around 40% of the planned height—an ideal height. When the leader’s diameter reaches 50% of the original trunk’s cross-section, cut off the excess at the junction of the original trunk and the leader with a 120° bevel so the wound heals faster, reducing scars and encouraging growth.
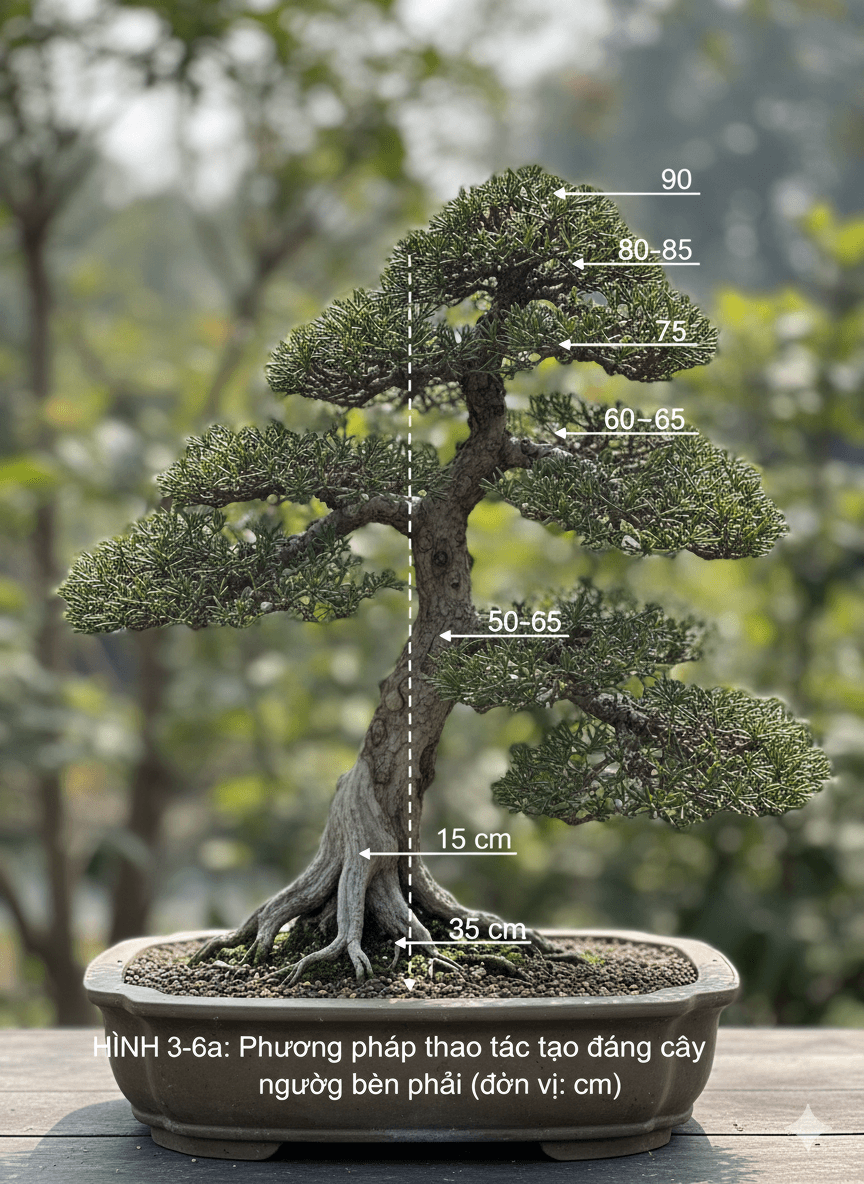
When the leader’s diameter reaches 70% of the original trunk, the second segment is basically complete. Repeat the right-side branch process and choose a bud 45–50 cm high so the trunk shows twisting when viewed at eye level. The bud should be on the right and slightly forward—this becomes the third leader segment. Choose a corresponding bud on the left for the second branch. When that branch reaches 0.6 cm in diameter, wire it slightly below the intended direction. When the third leader segment is 50% of the main trunk’s diameter, cut away the extra portion of the main trunk at the junction with a 120° bevel. When the third leader segment reaches 70% of the second segment’s diameter, cut it at a suitable height. Next, find a left-side bud at a good height and slightly to the back when viewed horizontally for the fourth segment. Keep a bud on the right to form the third branch. If no suitable bud exists, choose a nearby one and wire it once it reaches 0.6 cm to adjust direction. Set the third branch slightly low as described above. Repeat this approach until the crown is complete. As each section and branch thickens, the cross-section heals without hindering growth while conveying power and age. As new sections and branches form, earlier ones continue to thicken. By the time the crown develops, 80% of sections one through four and their branches are done. The entire process takes about 16 years, with another four years in a display pot—then the piece is complete. This technique also suits other large species (Figure 3-6a).
(Figure 3-6a). Sketch of a right-leaning bonsai with height marks (cm):
3. Styling procedure for a tree leaning to the left
If the right roots (main roots) of an upright bonsai or left-leaning bonsai are swollen, coiled, and extend farther, select a right-side bud on the trunk as the leader and place the first branch on the left. In the early stage, wire the second segment of the leader early so it leans right and slightly to the back to form a counterclockwise twist. Choose a bud on the left to become the first branch and fix it slightly low with wire so it extends into a branch plate. This keeps the height distribution within the planned profile and clarifies the layers.
Each trunk section should twist to avoid stiffness and feel more natural. The length of every section should stay proportional to the trunk diameter and overall length. The first trunk segment and the first preserved branch are set by the total planned height. Cut each section 10–15 cm apart. Select the first branch around 35 cm high; when finished, the total height of 85–90 cm is reasonable and natural.
If the trunk is planned to be under or over 15 cm in diameter, start the second branch around 40% of the planned height. When the leader reaches 50% of the original trunk’s cross-section, saw off the small remaining piece of the main trunk at its junction with the leader with a 120° bevel to help the bark heal quickly, reduce scarring, and promote growth.
When the leader diameter reaches 70% of the original trunk, the second segment is essentially done. Repeat the first-segment process. Cut the trunk at 50 cm high and select a bud about 45–50 cm high; at eye level you can see the trunk and branch curve and twist on the left. The bud should be on the left and slightly forward—this is the third leader segment. On the right at the corresponding position, choose a bud for the second branch. When the right branch reaches 0.6 cm in diameter, wire it a bit lower than the intended height. When the leader diameter is 50% of the main trunk, cut away the extra main trunk at the junction with a 120° bevel. When the third leader segment reaches 70% of the second segment’s diameter, cut it at a suitable height. Among the right-side buds, choose one at a proper height that angles slightly backward for the fourth segment.
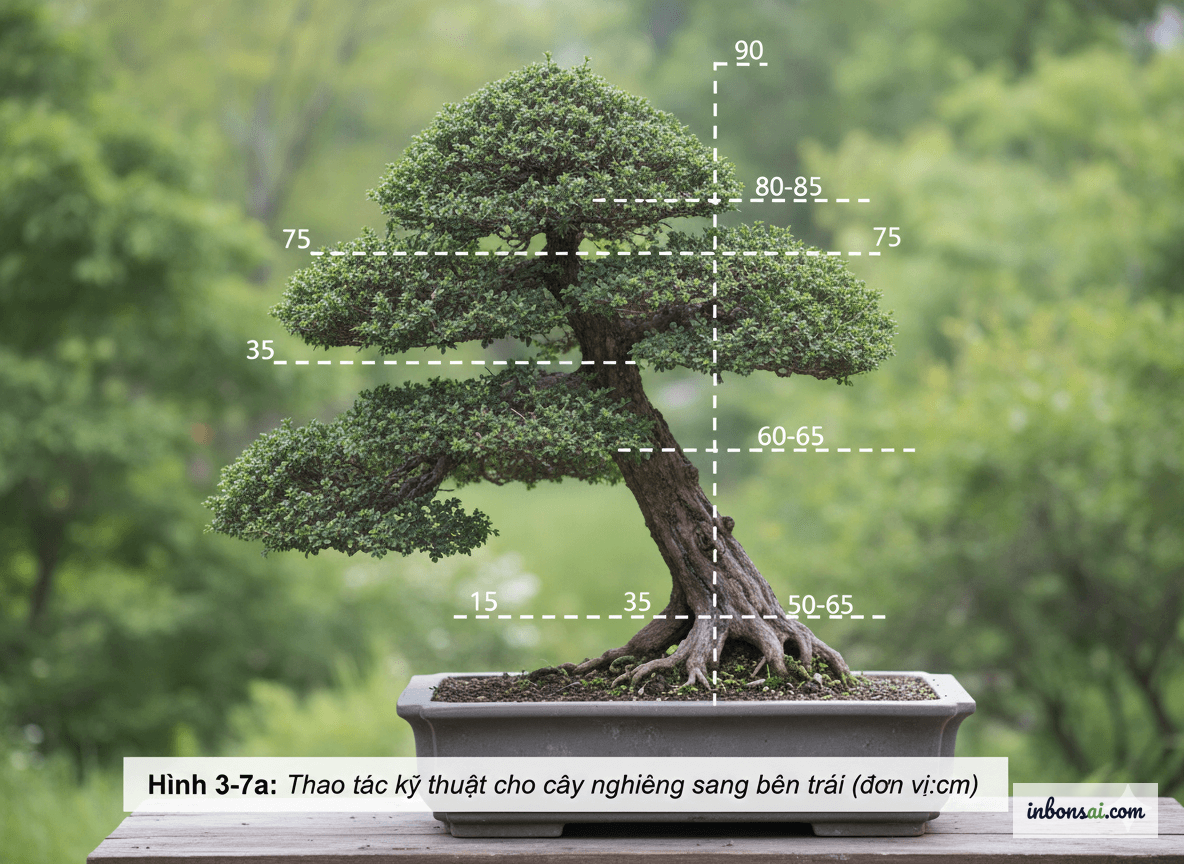
At the matching position on the right, keep a bud for the third branch. If no suitable bud exists, select one nearby and, when the new branch reaches 0.6 cm in diameter, wire it to adjust its direction. Setting the third branch slightly lower than the earlier layers looks better. Repeat this method until the tree apex is complete. After each section grows, the cross-section heals without hindering development while expressing strength and age. As each segment and branch increases, the earlier sections and branches keep thickening. By the time the apex forms, 80% of the first four trunk segments and branches are complete. The whole process takes 16 years, plus four more years in a decorative pot to finish a refined piece. This technique also fits other large trees (Figure 3-7).
Related Posts
Ling Nam Bonsai Trunk Styling Method (Grow-and-Prune Technique) (Part 1)
Bonsai Pruning Guide for Beginners: Step-by-Step

Methods for Creating Scenery for Lingnan Rockery Bonsai (Penjing)
How to plant Yellow Mai suitable for climate and ecological conditions
Why is the Yellow Apricot Tree considered a precious ornamental plant?
Methods for Creating Root Styles for Lingnan Bonsai
Linh Nam Bonsai Collection (Part 1)